Thursday, November 29, 2012

bread crumbs

I'm a big fan of bread crumbs. Yes, this usually involves pan frying - not the healthiest preparation option, but delicious nonetheless. However, it can also involve baking! Such as homemade chicken nuggets :)

I almost always have a combination of Panko bread crumbs and Italian seasoned bread crumbs on hand. My favorite seasoned breadcrumbs are from 4C but those are not available at my local super market. Sometimes I go with Progresso, though currently I have Cento and they're really good!


I had some extra white bread left over after Thanksgiving and since we're not a white bread kind of couple, I decided to make some homemade bread crumbs. I left them plain, rather than seasoned but I can always add spices and herbs to them in the future. Simply lay out the bread so that it gets a little stale. You'll notice a change in texture within a few hours.


At that point, break up your bread into pieces and drop it into a food processor. Turn on the food processor to get a nice fine grind of your stale bread!

Transfer your crumbs into a bowl. Pour some olive oil and add salt and pepper. Mix with your hands to combine.

Spread your crumbs out on a baking sheet and pop them in a 350 degree oven for 6 to 8 minutes. Watch carefully because they'll quickly switch from golden brown to burnt!!

Enjoy your new breadcrumbs on chicken nuggets, eggplant parmigiana, and more!!


Wednesday, November 28, 2012

animal print


Major fashionista validation this week, folks! I posted my Monday attire on Instagram and when I logged on later in the day, I saw that Elie Tahari (@elietahari) liked my picture! I'm guessing that there's a PR person behind the instagram account, but it was such a fun surprise and huge compliment nonetheless.  I was wearing an Elie Tahari animal print (snake skin?) skirt with a charcoal gray turtle neck, black Tory Burch cardigan, and one of my favorite Pono statement necklaces.  Because the skirt has a fairly large slit in the front, which naturally separates when I sit, I paired this with solid black tights. My charcoal gray suede Bettye Muller booties were the perfect finishing touch.


I used a blue Avon nail polish to change my nails earlier this week. I'm hoping to add a floral design for an accent finger if I find some time this evening - it's been a while since I had a fun design on my nails!


And here's Tuesday's outfit... more animal print! The top is a sweater jacket from Michael Simon. And my tights are from Spanx - they make fabulous patterned tights which can frequently be found on sale at Rue La La!

Closing note to my readers: I am now less than 100 page views away from 20,000 lifetime page views!! And while I started this blog nearly five years ago, most of this traffic has been generated in the past 15 months since my relaunch. This is a huge milestone that I am beyond excited to celebrate. Thank you to each and every one of you for reading, following, and commenting!!

Tuesday, November 27, 2012

sponge bun

I recently tried out the "sponge bun", aka Bun Maker, by Conair. A friend of mine recently used one, and it looked great! I did some research and YouTube watching to figure out the best approach on how to use it. I have a lot of hair and it's currently medium length, so I wasn't sure how I was going to wrap it around and secure it to the sponge bun. I went with an approach similar to the directions on the back of the box;

  • Secure hair in a ponytail
  • Pull ponytail through the center of the sponge bun so it's resting around the elastic
  • Take sections of hair and wrap it over that section of the sponge bun, secure with a bobby pin
  • Wrap the rest of that section around the sponge bun, continuing to secure with pins

Because I have so much hair and it's rather heavy, this wasn't the best approach. The look I achieved was favorable, though; a chic messy bun with lots of volume. However, I had to continue to play with the bobby pins all day and chose to remove it completely around 3 pm. At that point I twisted my hair into a bun and secured it with an elastic - I'm lucky enough that I can achieve a full bun with just my hair!

Next time I might try the rolling technique. This involves securing a ponytail and using the sponge bun from the tip of the tail and rolling your hair around as you roll the sponge bun towards your head.

Wednesday, November 21, 2012

Pretty packaging

This weekend I made some chocolate drop cookies, mentioned in this post. Some were for thank you gifts and I wanted to deliver them in a special way. I had seen a few variations for packaging cookies on Pinterest and I was excited to try them! The first was made from an empty container of bread crumbs. I peeled off the label and taped on some wrapping paper. I used kitchen twine to tie a "thank you" note around it.

One thing I noticed half-way through baking my cookies was that the opening in this container was smaller than I thought. So I had to adjust the amount of batter I put down on the baking sheet so that the cookies would be smaller. Make sure you check out your container before or during baking so that you can adjust accordingly.

My next packaging idea was so simple - it's just a little something extra on a sandwich bag. It came out so wonderfully, it even surprised me! I simply placed cookies into a sandwich bag. Then I used some cardstock and measured out a rectangle about the length of the bag and three inches high. I folded the paper in half and drew a design on the front, with a message on the back. I stapled the cardstock to the top of the sandwich bag, and I just love how it turned out!


Now that the holidays are around the corner (THANKSGIVING IS TOMORROW!!!!!!) how do you plan to deliver your cookies? I know tins are a go-to... in fact, I saw a great post on Newlyweds on a Budget on how to customize and shnaz up your tins.


Tuesday, November 20, 2012

Someone's in the kitchen... on Sunday!


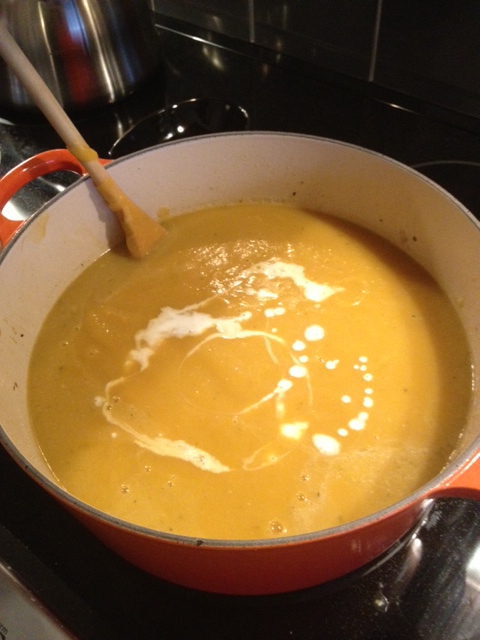
Sunday was a little less hectic. I set to work making a winter squash soup for Thanksgiving weekend. It's a delicious blend of acorn and butternut squashes. I have not made the gruyere croutons with this soup, because I feel that it doesn't need the added richness. It's really quite phenomenal as is and I'm looking forward to having some for lunch this coming Friday.

I had extra butternut squash left over and because I got hungry in the late afternoon, I chose to make some roasted butternut squash to nosh on. It was very easy to make and delicious as well! I simply put the 1 inch cubes of squash into a bowl, poured a little maple syrup (maple syrup not breakfast syrup... I highly prefer the real stuff) and melted butter on top. Then I grated a nutmeg over it all and finished it off with some cinnamon. I tossed these ingredients around and laid the squash out on top of some parchment paper on a cookie sheet. They baked for about 45 minutes at 350 degrees and came out sweet and soft. The syrup caramelized the slightest bit which was quite a pleasant surprise.


For dinner I made homemade chicken nuggets and parmesan-rosemary french fries. These are real simple things to put together, and a very inexpensive dinner! The best trick to get crunchy fries is to cut your potato and soak the pieces in a bowl of water. When your potato is in water it soaks out the starch and helps your potatoes get crunchy while in the oven. I took the fries out of the water and put them into another bowl. I poured some extra virgin olive oil on top and sprinkled parmesan cheese, fresh ground black pepper, and rosemary. I tossed them around and laid them out on a parchment lined baking sheet. 

Note: extra virgin olive oil burns very easily. Don't use any heat higher than medium on a stovetop and don't put your oven over 350 degrees. I had my fries in the oven for almost 50 minutes at 350, turning them a few times in between. They did stay in at 400 while the chicken was baking but by that time a lot of the oil had either cooked off or soaked in, I'm not sure where it went, but the fries were A-OK.

Homemade nuggets and crispy fries! And, you can just see a little bit of the squash at the top-left corner of my plate :)
For the nuggs - and let me say, I am a self-proclaimed nugg nut and I am serious about my nuggets. As I was saying, for the nuggs, set up two separate bowls. In one, pour some olive oil, maybe 1/3 cup, and add some salt and pepper. In the other, add some Italian seasoned bread crumbs, panko bread crumbs, and parmesan cheese. Mix the dry ingredients together to blend. Cut up a chicken breast (or two) into 1-2 inch bite sized pieces. Add the chicken into the olive oil to get well coated and transfer the pieces over to the bread crumbs. I usually take 3-4 pieces and shake them in my hand a little so the excess olive oil falls between my fingers. Then I use my other, dry, hand and coat the pieces. Place these nuggs on a baking sheet. (I wish I could tell you to do a parchment lined sheet, but in fact I used aluminum foil and the breading stuck. Cooking fail. I'll try parchment next time!) These bad boys bake for about 20 minutes at 400 degrees. Serve with some honey mustard and ketchup. 

Nom. Nom. Nom.

Monday, November 19, 2012

Someone's in the kitchen... on Saturday!

This weekend reinforced my love for being in the kitchen. On Saturday afternoon I spent nearly six hours on my feet cooking and baking, only to realize around hour five that my feet were hurting and maybe I should put some shoes on! Well, that didn't stop me because I also spent the better part of Sunday in the kitchen. Here I'm going to talk about all the goodies and meals I made this weekend, but stay tuned for another post soon about some wrapping and presentation ideas!

Oh, look at that messy island! My kitchen scale, front and center, is one gadget I cannot live without. I thank my fiancee for introducing me to how amazing they are!

I started out with a red velvet cupcake. I was making them the same day I was serving them, so I needed ample time for the cupcakes to cool before icing. I was super excited for the icing because I had bought a size 16 star tip for my pastry bags which I had not previously used. I planned to put it to work on these! I followed the Martha Stewart recipes for the cupcakes and the icing and with the exception of halfing the recipes, I did not make any adjustments. I had extra icing left over, but that's not really a terrible problem to have ;-)
Yummy, tasty goodness!
When I brought these cupcakes to the party, they were a big hit! One party goer even told me that it was better than a lot of wedding cakes she's been tasting for her upcoming nuptials. Clearly, that was one of the best compliments I have ever gotten!!

I also had a thank you gift to make, which I promised to deliver in the form of baked goods. I decided to go for my very favorite cookie recipe; Chocolate Drop Cookies with Heath Bar, Vanilla Chips, and Pecans from The Magnolia Bakery. I tend to substitute the pecans with whichever nuts I have on stock at home. This time I used a blend of hazelnuts and toasted walnuts. Also, in case you're wondering what the heck vanilla chips are - I go with plain ol' white chocolate chips. Ghirardelli or Toll House work great!

My ravioli press, a pastry bag with filling (keep it in a tall glass when not in use!), and chocolate drop cookies cooling in the background. Ah, yes, a glass of chardonnay as well.
Following this baking extravaganza it was time to make dinner! Inspired by a satirical and hilarious article on deadspin, The Haters Guide to the Williams Sonoma Catalog, I set out on a mission to make a pumpkin parmesan sauce despite the fact that I do not own pumpkin tureens. Sigh. I also wanted to use my new gift from Ross; a ravioli press! And thus the idea for cheese ravioli with pumpkin parmesan sauce was born. We rounded out all those carbs with some sauteed spinach. Unfortunately, I didn't snap a picture of the finished product, but the raviolis really looked great and were tasty too! Also, using a pastry bag with a large tip to fill the raviolis is MUCH easier than portioning out the filling with a spoon. If you don't have a pastry bag and/or large tip you can always put your filling into a ziploc bag and cut off the corner - voila! Instant ravioli filler.

Real-time view of making raviolis. Make sure you have some wax paper on hand to lay them on to dry a bit before cooking.
And that was just Saturday!! Another post on Sunday's kitchen happenings to be added shortly...